Thursday, May 2, 2013

How To Add Or Change Favicon On Blogger Blogspot

Favicon (Favorites Icon) is the small picture (usually 16px x 16px in size) you see beside some some site's name in your browser's address bar. Having your own favicon with a nice graphical reminder of your site beside is a good way to get visitors attention. Blogger users can add a custom favicon for their blogs going to the Layout section and by clicking on the Edit link on the "Favicon" element.


"For many bloggers, having a custom favicon (the tiny image displayed in your browser’s window or tab) is the finishing touch that ties together the design and identity of a great looking blog. Today, we're pleased to announce that Blogger in Draft users can now add a customized favicon to their blog. ~Blogger in Draft"

How To Add a Favicon to Your Blogger Blog

Step 1. Log in to your Blogger's Dashboard, go to the Layout and click on Add a Gadget link


Step 2. Click on the "Edit" link on the "Favicon" setting above the navbar element.


Step 3. A popup window will open where you can search for an image in your hard drive to replace the default favicon image. Click on "Browse" button and search for your favicon (it should have the .ico extension) - then click on "Save".


Step 4. Now you should see your own favicon instead of blogger's default favicon.


It might take some time until your new favicon will appear in your Browser's tab or window.


How to add an animated favicon in Blogger

Step 1. Log in to your Blogger account > Template > Edit HTML (if needed, click on Proceed button)


Step 2. Select the "Expand widget templates" box


Step 3. Search (CTRL + F) for : <b:skin> 

Step 4. Paste this code just above it : 
<link href="your-favicon-links-goes-here" rel="icon" type="image/gif"/>

See the screenshot for more details


Note: replace your-favicon-links-goes-here with your favicon's link location

You can choose from here some cool favicons for your site/blog: http://www.favicon.cc/ (just download the favicon you like - upload it on tinypic or on a blogger's post, then copy the link address/direct link)

Step 5. Save the Template. And you're done!

Remove JPAGE_CURRENT_OF_TOTAL


If after upgrading to the latest version of Joomla 1.5.15 you started to get JPAGE_CURRENT_OF_TOTAL displayed at the bottom of the page just below the page navigation, this means that you're using localized version of the Frontend and that if you want to get rid of this mess you should keep reading.

This is how typically it would look like:

«Inicio Prev 1 2 3 4 5 6  7 8 9 10 Próximo Fin»

JPAGE_CURRENT_OF_TOTAL

The problem is the lack of appropriate language pack for the installed version of Joomla. JPAGE_CURRENT_OF_TOTAL is in fact a "code representation" of the sentense "Page x of z." and the reason you seeing it this ways is because your current language pack doesn't have this sentence in it. This string actualy belong to the Joomla pagination plugin.

Solve it in 2 ways:
  1. Download a matching language pack for the version of Joomla you're working with.
  2. If the language pack is just not available yet, fix it manually:
  • Locate the main localization file - so if you have Finish installation it would be : <Joomla folder>\language\yourlanguage\yourlanguage.ini
  • Manually add the following line in to it: JPAGE_CURRENT_OF_TOTAL=Page %s of %s
That's it! Hope this tip was helpfull.

Sunday, April 28, 2013

Fixing Invalid argument supplied for foreach() in .../extension.php on line 106


If you get error message :

Invalid argument supplied for foreach() in./administrator/components/com_installer/models/extension.php on line 106

So you can solve this by open its php file (extension.php) then

change the offending line from 
 $data = json_decode($item->manifest_cache); 
to 
 $data = unserialize($item->manifest_cache);

Extensions to connect to Social Media

Not only for businesses but also for individuals, it's essential to show your social activities to visitors. You have written many helpful articles, and they're worth sharing. Integrating your Joomla site with social media channels will help you drive more traffic to your site and advertise your articles better. I've tested many Joomla extensions and in this article, I am going to tell you about some of the best free social extensions that you need. Firstly, you should have a look at several types of extensions I will mention today, categorized by functionality:
  • Display your channels
  • Add comments
  • Bookmark and share
  • Display social profiles
  • Login using a social network's account

Display your channel
Stalker

When I build my social media channels, the first thing I do is show them on my website for people to notice. It's really difficult for me to go to each channel and grab the integration code. I need one extension that allows me to show all my channels easily. Stalker is a great Joomla social extension for that need. The main reason I chose this Joomla 2.5 extension because I can show up to 52 social media channels to my visitors: Twitter, Facebook, YouTube, and Google+, just by entering my user ID for each channel. I can also add more networks or customize my icons to fit my template. Moreover, Stalker can display icons anywhere on the site: in a module position, directly in an article or even in a Community Builder profile.


Stalker module on the site

This extension contains two parts for you to install: the component to control multiple links to social media, and the module to display the icons. If you only want to show one link, you can install only the module. Registration is requiredfor you to Download Stalker but don't worry it's all free. After downloading and installing the extension, you can configure all the settings in the module manager page.


Module manager page of Stalker

Add comments with social media accounts:
RokComments

Recently in many websites, people can add comments for articles by using their social media account. That helps you to avoid spam as well as connect to visitors better. So which social extension can be used in this case? RokComments is one recommendation. Some other Joomla 2.5 extensions only support one comment platform; RokComments can be set up to use all the most popular comment platforms now: IntenseDebate, Disqus, Facebook, etc. You can change the platforms whenever you want without new extension installations as well as choose the menus sections or categories to display in the comment area.


Disqus comment platform

You can download RokComments and install it like other extensions. A step-by-step quick guide with images is included in the settings page so you can look at the guidelines and do the configuration in the same window. Choosing and configuring the comment system just takes about one minute. After that you will get the comment area under your articles.


RokComments setting page

Bookmark and share articles to Social media channels
Nice Social bookmark

One of the best ways to promote your articles is to put bookmark and share buttons for each blog post. This approach is very popular, so many Joomla extensions support the functionality. One of the most famous plugins is Addthis. However in my opinion, it's too simple and doesn't encourage people to share your articles. You might need a sharing tool which puts a series of sharing buttons, with the number of shares displayed alongside, put at the end of your articles. I recommend Nice Social bookmark, another free Joomla extension. Nice Social bookmark only supports 13 of the most popular channels but I think that's enough. (Addthis allows over 350 channels but I'm sure you are not going to use more than 20 of them).


Nice Social Bookmark preview in website

Even you are a Joomla newbie; you will find it easy to use this extension. Download Nice social bookmark and install it. You can then configure which channels appear using Module manager. Additionally, you can customize 4 more icons and links.


Nice Social Bookmark settings page

Nice Social bookmark and Addthis can make a great combination to encourage visitors to share your articles.

Display your social profiles
Facebook

When I have a fan page, I can get the Facebook fan box code to show on my website. Unfortunately I still have to fix an issue, in which Joomla 2.5 strips html and iframe code to get the code to work. In addition, FB fan box can't be easily resized as I want. That's the reason why I use a Joomla social extension. You can read Add the Facebook like box : How to do with a Joomla website to have more information. It's not difficult to find an extension to display a FB fan box as there are plenty of them. I personally choose ITPFacebookLikeBox because it has many useful functions: you can rend your code in an iframe and control your box's appearance (dimension, colour, stream, header, language, etc.) with just a few clicks.


Facebook like box on website by using ITPFacebookLikeBox

You can download ITPFacebookLikebox without registration and install it on your Joomla site. After that you can go to Module Manage to configure it. All settings are very basic and knowledge of coding is not required.


ITPFacebookLikeBox setting page

Twitter

Twitter is the second most popular social media channel at the moment. Twitter was born long before Facebook so there are many more Twitter display extensions available than for Facebook. One of my favourites is Twitter Show. This free Joomla extension allows you to show your Twitter profile with 8 parameters for dimensions, appearance, number of tweets, etc. In my opinion, Twitter Show supports more functionality compared to other Joomla 2.5 extensions.


Display Twitter's activities on website

Download Twitter Show and you will see how it works. There's no documentation for this extension because you won't need it. All settings can be configured in parameters and the box will be displayed with one backlink at the bottom. If you don't want to have the backlink, you can use another similar extension: Optimized Tweets. However you must type the color code without the # and there is no color picker.


Twitter Show's settings page

Login using a social network's account
Social login

Nowadays, social media profiles are so popular that many websites allow you to login with your social media account,such as Facebook, Twitter, Google, etc. Therefore people don't have to register another account on the website. And in my opinion, the best Joomla 2.5 extension for this functionality is Social login. This extension can be used stand-alone or integrated with Joomla's traditional login. It gives you access to more than 15 ID providers, and also includes social data and analytics. You can choose the most convenient methods to login. This social extension comes with a nice design so you won't have to worry about customizing the CSS.


Social login is displayed on website

It is easy to download Social login and install it, as it doesn't require registration. However, you must login to the provider's website Loginradius using your social media account (Gmail, Facebook, Twitter, etc,) to get the API key and API secret. Every time you want to change ID providers, you need to login to the Loginradius website and choose the ID providers you want to add. That could be a bit difficult for users but I think it's alright because it doesn't take much timeand if you don't want to make future changes, just select all providers at the beginning.


Social Login setting page

So, I have listed 6 free Joomla 2.5 extensions you should have for your social media marketing. Which extensions are you using for your site? 

Setting up Facebook Connect

Facebook Connect is a system that allows any user with a Facebook account to join your site easily with just one single click. It saves your visitor the hassle of registering to yet another site and maintaining another username and password. With this system, your site can easily verify the identity of your site visitor and log them into your site easily.

Follow this setup instructions :


To setup Facebook connect, you will first need to create a new application in Facebook by accessing https://developers.facebook.com/apps. You are required to have a Facebook account. At the top right, there should be a button called Create New App; click it. Give your application a name. This name will appear as your applications and you are not restricted to use any name. You will have to read through Facebook’s Terms of Service before accepting it.

You will then be redirected to your application's Basic Info page. Please be sure to fill in every detail shown in the picture below that is marked with an asterisk (*).


Do not leave the App Domain field empty. Enter the domain name as shown in the image above. Please be certain that the Site URL is in the full format, i.e: http://www.mysitedomain.com. Save the changes.
Using the Keys In JomSocial

Go to JomSocial Configuration > Facebook Connect and paste the App ID into the Facebook API Key and the App Secret into the Facebook Application Secret field.


Congratulations! JomSocial Facebook Connect is now set up on your website!

Thursday, April 25, 2013

Creating Related Post in Joomla

For this purpose, you could use joomla plugin :

1. One of them is RelatedArticleplugin (go to http://extensions.joomla.org/ ). 
2. Just install and activate the plugin in plugin manager, finished already. 
* You can also set the number of articles on it. 

Remove LAST_UPDATED2

After changing language, maybe you found an error message/bug displaying 'LAST_UPDATED2 '. To remove this you can follow this instructions :

1. Sign in to your website file manager
2. Entry to the / language / your_language / your_language.ini
3. Add the following line in the file yourlanguage.ini

Page = Page% s of% s
LAST_UPDATED2 = Last updated on% s4. 

Done, that's it. View the changes. May be useful

Change Title of Administrator Backend

To change the title in joomla administrator backend login screen, which looks like "Joomla! Administration Login", the steps are :

1. Find the file /joomla_path/administrator/language/en-GB/en-GB.ini.
2. Then search for the text "Joomla! Administration Login", 
3. Replace the text to the right side of the equal sign to anything you like.


Remove GNU/GPL Licence?


If you want removing "Joomla! is Free Software released under the GNU/GPL License." at the footer of each page, the steps are :

Reguler Mode
1. Go to Extensions -> Module Manager -> Footer -> Unpublish
* for administrator page, go to administration tab


Syntax Mode
1. Go to the language folder
2. open en-GB.mod_footer.ini file
3. Replace the text as below for footer_line1 and footer_line2
FOOTER_LINE1=Copyright &#169; %date% %sitename%. All Rights Reserved.
FOOTER_LINE2=


note : keep "FOOTER_LINE2=" as blank


Saturday, April 20, 2013

Change Welcome to Frontpage text


To change the welcome to Frontpage text on the front page :
- Check and edit your menu item under : Parameters - System there is a field called Page Title.


Fatal error after installing JA T3 system plugin


Go to plugin remove line 32 in: ja3\core\framework.php 
[ 
t3import ('core.joomla.documenthtml');

Friday, April 19, 2013

Remove the Joomla Meta Name Generator Tag

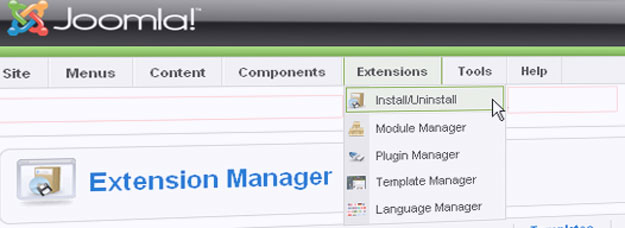
Plugin (Joomla 1.5, 1.6, 1.7 & 2.5)

By far the easiest way is to use the Joomla plugin 
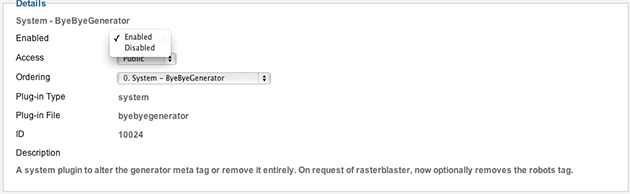
ByeByeGenerator. Install the plugin, enable it, verify the meta tag is removed in the source code and you are done. Not only is the method the easiest, it will work for any version of Joomla. 1.5, 1.6, 1.7 & 2.5. This method is also persistent, so if you change your templates a lot or do any updates, this plugin will always work and never get overridden. But what if you are a purist?


Manually


Steps#A (Joomla 1.7)
In Joomla 1.7, the system automatically creates a META Generator tag that you might want to change or hide.

The default tag looks like this: <meta name="generator" content="Joomla! 1.7 - Open Source Content Management" />

There is no way within Joomla to change or remove this tag, so you have to put a little line of PHP in your template.
Edit your template and look for this line: <jdoc:include type="head" />

Just above that line, paste in the following: <?php $this->setMetaData('generator','my site'); ?>

The two lines together should look like this: <?php $this->setMetaData('generator','my site'); ?> <jdoc:include type="head" />

In the above code, substitute your custom generator tag value in place of the words my site.

Because this hack is in your template, you don’t have to worry about the next upgrade to Joomla overwriting hacked core files.

Ilustration with Joomla 1.7 default template Beez2 – Default

 
Editing the HTML of Beez2 – Default, you will see on line 36 is the opening HTML <head> tag, then on line 37 is <jdoc:include type=”head” />

We’re going to insert a new PHP command between line 36 and 37 — between the <head> tag and the <jdoc:include type=”head” />

Copy the following code:<?php $this->setMetaData('generator','my site'); ?>

Then paste this code into the Beez2 – Default template code between line 36 and 37. Your code should now look like this:

To customize this, you will replace your own value for the ‘my site’ value. In my case, I use my domain name.

Now, save the template and upload. Switch to your web browser, reload the page, and view the source.

Steps#B (Joomla 2.5)
The method to removing the meta name generator tag for Joomla varies between versions. On Joomla 2.5 you can simply add this code to your index.php file in your template.
JFactory::getDocument()->setGenerator('');

Put it just after the line //no direct access. This method will vary greatly on what template you are using and from what company, so I cannot get too detailed. For example YooThemes has a different template structure then RocketThemes. You will have to noodle around a bit yourself in order to do this. The main advantage of editing the template code instead of installing a plugin is less overhead. The fewer plugins you have, the faster your site will be, and queries add up fast.

Steps#C (Joomla 2.5)Add following line in the source code of the index.php of your template: $this->setMetaData('generator','');

Add it direct after the line: defined('_JEXEC') or die;

Steps#D (Joomla 2.5)
To remove the <meta http-equip> tag in Joomla 2.5.6 comment out (put 2 forward slashes at the beginning of) lines 72-102 in the file libraries/joomla/document/html/renderer/head.php (see below)
Also, remember to declare a character set elsewhere - such as in your .htaccess file .

// Generate META tags (needs to happen as early as possible in the head)
//foreach ($document->_metaTags as $type => $tag)
//{
//foreach ($tag as $name => $content)
//{
//if ($type == 'http-equiv')
//{
//$content .= '; charset=' . $document->getCharset();
//$buffer .= $tab . '<meta http-equiv="' . $name . '" content="' . htmlspecialchars($content) . '" />' . $lnEnd;
//}
//elseif ($type == 'standard' && !empty($content))
//{
//$buffer .= $tab . '<meta name="' . $name . '" content="' . htmlspecialchars($content) . '" />' . $lnEnd;
//}
//}
//}
// Don't add empty descriptions
//$documentDescription = $document->getDescription();
//if ($documentDescription)
//{
//$buffer .= $tab . '<meta name="description" content="' . htmlspecialchars($documentDescription) . '" />' . $lnEnd;
//}
// Don't add empty generators
//$generator = $document->getGenerator();
//if ($generator)
//{
//$buffer .= $tab . '<meta name="generator" content="' . htmlspecialchars($generator) . '" />' . $lnEnd;
//}
//$buffer .= $tab . '<title>' . htmlspecialchars($document->getTitle(), ENT_COMPAT, 'UTF-8') . '</title>' . $lnEnd;

Steps#E (Joomla 2.5)
Your Joomla site always comes with a default meta generator to show that your website is a Joomla site, and sometimes it will show its version as well. It is important to hide this for security measures if you do not want others to see your source code and know it is a Joomla site and what version it may be. It is good to be aware that the changes you make will be overwritten when upgrading your Joomla version.

1. Open your head.php file


Open your FTP program.
Navigate to this file: (root directory)/libraries/joomla/document/html/renderer/head.php
Open your head.php file with a Text Editor.

2. Navigate to the meta generator section of the PHP code


Look for the line of code that creates a function called getGenerator().

3. You can remove the line of code by commenting it out and your site will now show a meta name generator


Adding 2 slash lines in front of the code will prevent the website from rendering it as code. So it's basically removed, without removing it. It's always safe to do the commenting method so you can always revert back to previous changes.

4. Instead of commenting it, you can change the code


You can change this to any type of meta name you'd like. I changed my site to "author" with my name in the double quotes, removing everything else within the quotes first.

Congratulations! You now have full control of your header file, but remember you are able to edit most sections using your admin panel but it is good to know how to remove sections and where to find the actual file your header code is generated at

Thursday, April 18, 2013

7 tips to optimize Joomla! security

Joomla! is a great CMS that is used worldwide. For this reason, hackers often try to find a way to hack a Joomla! website. Here are 7 tips to optimize your Joomla! security, preventing your Joomla! website getting hacked.


Always remember to make a regular backup of your website and database. If you still get hacked, you can always get back to an older version of your website. Make sure you find out which extension caused the vulnerability and un-install it.

1. Change the default database prefix (jos_)
Most SQL injections that are written to hack a Joomla! website, try to retrieve data from the jos_userstable. This way, they can retrieve the username and password from the super administrator of the website. Changing the default prefix into something random, will prevent (most / all) SQL injections.
You can set the database prefix when installing your Joomla! website. If you've already installed Joomla! and want to change your prefix, do the following:
  1. Log on to your Joomla! back-end. 
  2. Go to your global configuration and search for the database 
  3. Change your database prefix (Example: fdasqw_) and press Save. 
  4. Go to phpMyAdmin to access your database. 
  5. Go to export, leave all default values and press Start. Exporting the database can take a while. 
  6. When done, select all code and copy it to notepad (or any other text editor) 
  7. In phpMyAdmin, select all tables and delete them 
  8. In notepad, do a Search & replace (Ctrl + H). Set the searchterm to jos_ and change it into your new prefix (Example: fdasqw_). Press "Replace all". 
  9. Select everything in your notepad file and copy it. In phpMyAdmin, go to SQL, paste the queries and pressStart. 
2. Remove version number / name of extensions
Most vulnerabilities only occur in a specific release of a specific extension. Showing MyExtension version 2.14 is a really bad thing. You can modify this message to only the name of the extension by doing the following:
  1. Retrieve all files of the extension from your server. 
  2. Open up Dreamweaver. 
  3. Load any file from the extension that you just downloaded to your local machine. 
  4. Use the Search function and set the search to Search through specified folder. Navigate to the folder where you downloaded the exploit to. 
  5. Set the search term to "MyExtension version 2.14" and press OK. 
  6. When found the correct file, remove the version number. 
  7. Upload the changed file to your server and check if the changes are made. 

3. Use a SEF component
Most hackers use the Google inurl: command to search for a vulnerable exploit. Use Artio, SH404SEF or another SEF component to re-write your URL's and prevent hackers from finding the exploits.
Additionally, you'll get a higher rank in Google when using search engine friendly URL's.

4. Keep Joomla! and extensions up to date
This one is pretty obvious. Always check for the latest versions of Joomla! and the extensions you're using. Many vulnerabilities are resolved most of the times in later versions.

5. Use the correct CHMOD for each folder and file
Setting files or folders to a CHMOD of 777 or 707 is only necessary when a script needs to write to that file or directory. All other files should have the following configuration:
  • PHP files: 644 
  • Config files: 666 
  • Other folders: 755 

6. Delete leftover files
When you installed an extension that you didn't like, don't set the extension to unbublished. If you do, the vulnerable files will still be on your website. So simply use the un-install function to totally get rid of the extension.

7. Change your .htaccess file
Add the following lines to your .htaccess file to block out some common exploits. 
 
########## Begin - Rewrite rules to block out some common exploits
#
# Block out any script trying to set a mosConfig value through the URL
RewriteCond %{QUERY_STRING} mosConfig_[a-zA-Z_]{1,21}(=|%3D) [OR]
# Block out any script trying to base64_encode crap to send via URL
RewriteCond %{QUERY_STRING} base64_encode.*(.*) [OR]
# Block out any script that includes a < script> tag in URL
RewriteCond %{QUERY_STRING} (<|%3C).*script.*(>|%3E) [NC,OR]
# Block out any script trying to set a PHP GLOBALS variable via URL
RewriteCond %{QUERY_STRING} GLOBALS(=|[|%[0-9A-Z]{0,2}) [OR]
# Block out any script trying to modify a _REQUEST variable via URL
RewriteCond %{QUERY_STRING} _REQUEST(=|[|%[0-9A-Z]{0,2}) [OR]
# Block out any script that tries to set CONFIG_EXT (com_extcal2 issue)
RewriteCond %{QUERY_STRING} CONFIG_EXT([|%20|%5B).*= [NC,OR]
# Block out any script that tries to set sbp or sb_authorname via URL (simpleboard)
RewriteCond %{QUERY_STRING} sbp(=|%20|%3D) [OR]
RewriteCond %{QUERY_STRING} sb_authorname(=|%20|%3D)
# Send all blocked request to homepage with 403 Forbidden error!
RewriteRule ^(.*)$ index.php [F,L]
#
########## End - Rewrite rules to block out some common exploits


Use the correct and RECOMMENDED CHMOD for each folder and file

Setting files or folders to a CHMOD of 777 or 707 is only necessary when a script needs to write to that file or directory. All other files should have the following configuration:
  • PHP files: 644
  • Config files: 666
  • Other folders: 755

Remove version number / name of extensions


Most vulnerabilities only occur in a specific release of a specific extension. Showing MyExtension version 2.14 is a really bad thing. You can modify this message to only the name of the extension by doing the following:

1. Retrieve all files of the extension from your server. 

2. Open up Dreamweaver.

3. Load any file from the extension that you just downloaded to your local machine.

4. Use the Search function and set the search to Search through specified folder. Navigate to the folder where you downloaded the exploit to.

5. Set the search term to "MyExtension version 2.14" and press OK.

6. When found the correct file, remove the version number.

7. Upload the changed file to your server and check if the changes are made.

Change your Joomla Admin Folder Name or Path


If you would like to 'sort of' rename your Joomla administrator directory without having to modify any Joomla code or you don't want to have to use htpasswd to protect that directory, you can achieve it the following way. 
This may help limit issues for joomla security in the future.

Steps #1

1. Create a new directory in your root directory (eg. "myadmin")

2. Create an index.php file in your "myadmin" directory..
$admin_cookie_code="1234567890";
setcookie("JoomlaAdminSession",$admin_cookie_code,0,"/");
header("Location: /administrator/index.php");
?>

3. Add this to .htaccess of your real Joomla administrator directory
RewriteEngine On
RewriteCond %{REQUEST_URI} ^/administrator
RewriteCond %{HTTP_COOKIE} !JoomlaAdminSession=1234567890
RewriteRule .* - [L,F]

To enter your Joomla administration page, you point your browser to "http://yoursite.com/myadmin/" The php code will set a cookie that expires at the end of the session and redirect you to your real administration page. No one will be able to load anything from the administrator directory without having gone through the "myadmin" directory first. 

Needless to say, you would choose another directory name for "myadmin" and change the cookie code "1234567890" to something else. Security through obfuscation is no substitute for the real thing but this might make you feel a little better.

Steps #2


1. define( ‘JPATH_ADMINISTRATOR’, JPATH_ROOT.DS.’administrator’ );
to
define( ‘JPATH_ADMINISTRATOR’, JPATH_ROOT.DS.’myadmin’ );

2. Create a new directory in your root directory (eg. “myadmin”)

3. Create an index.php file in your “myadmin” directory..
<?php
$admin_cookie_code=”999999999″;
setcookie(“JoomlaAdminSession”,$admin_cookie_code,0,”/”);
header(“Location: ../administrator/index.php”);
?>

4. Add this to the beginning of index.php in real administrator folder
#administrator/index.php (modify , **do not replace**)
if ($_COOKIE['JoomlaAdminSession'] != “999999999″)
{
header(“Location: ../index.php”);
}

Changing language in K2 items

K2 is one of components on Joomla.  If you want to change language of its, here are the steps :


1. Get a translation package http://getk2.org/extend/translations
2. Now go to http://extensions.joomla.org/extensions/languages and search for your language pack to install first
3. Install first Joomla language pack
4. After that you can install the language pack for K2.

Unexpected end of MySQL Solution


If you installed local webserver and when I run it, an error message saying "Unexpected End of MySQL". The solution steps are : 
  • Open the file "C:\Program Files (x86)"
  • Right to -> properties on the folder EasyPhp
  • In the security tab, click the "Change ..."
  • In-list "names or groups of users,
    • select the active user: "Users (Computer_name\ Users),
    • then in the list" Permissions for Users "check" Full Control "of the column" Allow "(must check all).
  • click "OK"


Remove "You are here" on Joomla


Simply turn off the "Breadcrumbs" module in the Administrative area for the frontpage. Or just click on the disable button to turn it off sitewide.

To edit the words "You Are Here" to read something like, "Here's Where Yous At":, you need to edit the file LAYOUTS > BLOCKS >FOOTER.PHP

You'll see the words in source code of that file.

Joomla SEO meta tag recommendations


  1. In the Global settings area of Joomla’s administration panel, insure the fields Global Site Meta Description and Global Site Meta Keywords are empty.
  2. Change Joomla’s meta tag logic so that Joomla won’t needlessly insert empty tags in a page. The file islibraries/joomla/document/html/renderer/head.phpand the changes to make are in red. Technical folks may want to download a patch file for version 1.5.
    // Generate META tags (needs to happen as early as possible in the head) foreach ($document->_metaTags as $type => $tag) { foreach ($tag as $name => $content) {if($content != ''){ // only output tags if they actually have a value - Sean Carlos http://antezeta.com/ if ($type == 'http-equiv') { $strHtml .= $tab.'<meta http-equiv="'.$name.'" content="'.$content.'"'.$tagEnd.$lnEnd; } elseif ($type == 'standard') { // don't output <meta name="robots" content="index, follow" /> as this is too embarassing: its the default for search engines! - Sean Carlos http://antezeta.com/ if($name == 'robots' && $content == 'index, follow' ) { $content = 'index, follow'; // do nothing } else { $strHtml .= $tab.'<meta name="'.$name.'" content="'.str_replace('"',"'",$content).'"'.$tagEnd.$lnEnd; } } } } }$documentDescription = $document->getDescription(); if ($documentDescription) { // only output tags if they actually have a value - Sean Carlos http://antezeta.com/ $strHtml .= $tab.'<meta name="description" content="'.$document->getDescription().'" />'.$lnEnd; }if($document->getGenerator() != '') { // only output tags if they actually have a value - Sean Carlos http://antezeta.com/ $strHtml .= $tab.'<meta name="generator" content="'.$document->getGenerator().'" />'.$lnEnd; }
    In version 1.6, it isn’t necessary to change the logic which sets the meta description which has already been fixed.
  3. To remove the meta generator tag, it is necessary to add a line of code to the main template file, such astemplates/rhuk_milkyway/index.php
    <head> <?php $this->setMetaData('generator',''); ?> <jdoc:include type="head" />
Unfortunately these changes need to be reapplied should the Joomla software and/or theme be updated.

Remove the "Powered by Joomla!"


Joomla 1.5

Starting with Joomla 1.5 and its move to Internationalization and full support of UTF-8, messages for footer.php and other Joomla pages has been moved to a language specific file.
If you want to change the text, go to the language directory, go to the folder of the language you want to change, find the mod_footer.ini file and change the relevant text. For British English, the specific file is language/en-GB/en-GB.mod_footer.ini. Remember that you may not remove copyright and license information from the source code.
If you want to remove the footer entirely, go to Extensions > Module Manager and unpublish the footer module.
Other places where can look for options to make changes are these. If you find code related to footers in these files, you can either "comment it out" or remove it:
  • /includes/footer.php file.
  • index.php file for your active template

Joomla 1.0
You may remove that message, which is in footer.php. You may however not remove copyright and license information from the source code.

.htaccess File to Additionally Secure Your Joomla


You should make the following changes to the .htaccess file in the Joomla directory:
  • First, If you don't have a .htaccess file in your Joomla folder, you should rename the htaccess.txt file that comes with your Joomla installation package to .htaccess. To do this, you can use the File Manager tool in your cPanel. In addition, doing this will allow you to enable the SEF functionality of your Joomla application. The rules in it will block the majority of well-known attacks against your website.
  • Make sure you are running your website on PHP 5.2 or newer. All SiteGround customers have their accounts running PHP 5.2 by default.
  • Block the access to all files except index.php and index2.php. Note, however, that you may have to allow the access to some additional files if your extensions require them. If certain parts of your website do not appear, you can check the files that they rely on. Then, you can add them to the access rules. Generally, if you add the following lines to your .htaccess file, everything should work just fine:
    <Files *.php>
    deny from all
    </Files>
    <Files ~ "(^index.php|^index2.php)$">
    allow from all
    </Files>

Password protect your administrative area


Password protecting the "administrator" folder will add an additional layer of protection to your Joomla website. For more information on how to do that you should refer to our tutorial below. You should set username and password for your website different from the ones for your Joomla application.

Once you do this, you will have to login twice. First to access the login page of Joomla and then to login in the application itself.

That would make guessing your passwords a very difficult task for any attacker. In addition, even if there is a security breach within the Joomla script itself, a potential attacker won't be able to gain access to your administrative end even if s/he knows your login details.

Select the Password Protect Directories icon from your cPanel main page. A list of the directories on your account will appear.

cPanel - Password Protected Directories

Select the directory you wish to limit access to. In the new page, please create a username and a password for your user. Select a name that will appear in the login screen and click on the Save button to activate the protection.

cPanel - Password Protected Directories

ImportantPlease note that you have to create a directory before you enable the password protection for it. Also, using one and the same directory for the purpose of password protection and FTP storage at the same time is not recommended.

ImportantIt is also important to add that password-protecting your webroot (the www directory) will lead to inability of your website to be displayed directly.